Responsive Header Component Documentation
Responsive Header
Description
Responsive Header Component allows users to easily and quickly create AOL MSN Responsive Header banner with multiple features.
Note: Responsive Header Component is adapted only for MSN Responsive Header banner which could be launched on MSN network.
Initialization
To start with Responsive Header Component, follow these steps:
1) Make sure you keep SingleExpanding component in the head of the document. You can get rid of VideoPlayer if you don’t need to embed videos.
var components = [
            'SingleExpanding',
            'VideoPlayer' //if you remove this, remove comma after SingleExpanding
        ];
2) Load Responsive Header Component into your index.html document.
<!-- Components -->
    <script src="//s1.adform.net/Banners/Scripts/assets/components/Adf.ResponsiveHeader.min.js"></script>
<!-- Components -->Note: both banner html and CSS files contain useful comments which can help you edit banner content and elements.
3) Finally, set up initial settings. See an example of initialization:
// 1. New setup
Adf.ResponsiveHeader.setup({
    clicktag: dhtml.getVar('clickTAG', '//www.adform.com'),
    target: dhtml.getVar('landingPageTarget', '_blank'),
    scaleClose: false,
    collapsedHeight: 66,
    iframeClick: 1,
    expandedStages: [
        dhtml.getAsset(4) || "", //628x162
        dhtml.getAsset(5) || "", //970x250
        dhtml.getAsset(6) || "", //1272x328
    ],
    collapsedStages: [
        dhtml.getAsset(7) || "", //628x66
        dhtml.getAsset(8) || "", //970x66
        dhtml.getAsset(9) || ""  //1272x66
    ],
    video: {
        sources: dhtml.getVar('videoSources'),
        poster: dhtml.getAsset(3),
        clicktag: dhtml.getVar('clickTAG'),
        onCollapse: 'stop'
    }
});

// 2. Initialize Responsive Header
Adf.ResponsiveHeader.init();
Mandatory Settings
| Name | Type | Default | Description |
|---|---|---|---|
| clicktag | variable |
//www.adform.com |
Defines landing page URL. |
| target | variable |
_blank |
Defines clicktag target window. |
| scaleClose | boolean |
false |
Set true if you want to resize close button together with banner. |
| collapsedHeight | integer |
66 |
Set 31 if you want to display only IAB Leave-behind “Show Ad”. |
Optional Settings
| Name | Type | Default | Description |
|---|---|---|---|
| iframeClick | boolean |
1 |
Set 0 (or false) if you know how to add Adform clickTAG to your iframe code when 1 or true iframe is covered by a clickable element. |
| expandedStages | array |
none |
Set expanded stage background images through additional assets (from 4 to 6) or add relative path to images or HTML files (from the smallest to the biggest in case of 3; autoresize is enabled if only one asset is set). |
| collapsedStages | array |
none |
Set expanded stage background images through additional assets (from 7 to 9) or add relative path to images or HTML files (from the smallest to the biggest). |
| video | object |
default |
Read below for video object settings, set onCollapse to either stop or pause the video on collapse. |
Video options can be passed to video object. All available options are listed in Video Player Component Documentation.
Note: optional settings can be removed from code if there is a need.
Example: Responsive Header: 66px height (based on images)
1) Code initialization:
<!-- Components -->
    <script src="//s1.adform.net/Banners/Scripts/assets/components/Adf.ResponsiveHeader.min.js"></script>
<!-- Components -->

    <!-- User code -->
    <script>
        Adf.ResponsiveHeader.setup({
            clicktag: dhtml.getVar('clickTAG', '//www.adform.com'),
            target: dhtml.getVar('landingPageTarget', '_blank'),
            scaleClose: false, //set true if you want to resize close button together with banner
            collapsedHeight: 66, //31 if you want to display only IAB Leave-behind "Show Ad"
            iframeClick: 1, //set 0 if you know how to add Adform clickTAG to your iframe code
            expandedStages: [
                dhtml.getAsset(4) || "", //628x162
                dhtml.getAsset(5) || "", //970x250
                dhtml.getAsset(6) || "" //1272x328
            ],
            collapsedStages: [
                dhtml.getAsset(7) || "", //628x66
                dhtml.getAsset(8) || "", //970x66
                dhtml.getAsset(9) || ""  //1272x66
            ],
            video: {
                sources: dhtml.getVar('videoSources'),
                poster: dhtml.getAsset(3),
                clicktag: dhtml.getVar('clickTAG'),
                onCollapse: 'stop' //set "pause" if you want video to pause on collapse
            }
        });

        Adf.ResponsiveHeader.init();
    </script>
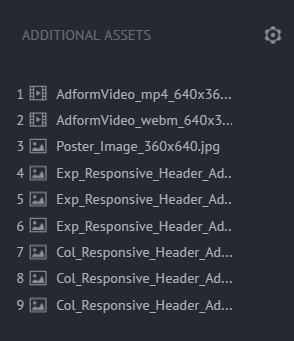
2) Assign banner assets (video files, poster image, collapse & expand background images):

Note: keep Additional Assets in the following order:
1. Video assets (mp4, webm)
2. Video poster (png, jpg)
3. Expand section images (png, jpg)
4. Collapse section images (png, jpg)
Example: Responsive Header: 66px height (based on HTML content)
1) Code initialization:
 <div id="adf-banner" class="adf-Banner u-fullWidthHeight">

        <!-- Banner contents -->

        <!--Collapsed stage -->
        <div id="adf-collapsed" class="adf-Collapsed">

           <!--PLACE YOUR CODE OF COLLAPSED SECTION CONTENT HERE-->

            <!-- Notice: if you insert content here it will keep 66px height but will response in width, so create it accordingly -->
        </div>

        <!--Expanded stage -->
        <div id="adf-expanded" class="adf-Expanded">
            <div id="adf-click-area" class="adf-ClickArea u-fullWidthHeight">

                <!-- Responsive container - do not remove -->
                <div id="adf-scalable" class="adf-Scalable">

                  <!--PLACE YOUR CODE OF EXPANDED SECTION CONTENT HERE-->

                    <!-- Content to Scale - insert real content (not just text) here if you want to automatically scale it -->
                </div>

                <!-- Close button - do not remove -->
                <div id="adf-close-button" class="adf-CloseButton adf-Button">Close X</div>
            </div>

            <!-- Video player - feel free to remove this element -->
            <div id="adf-video" class="adf-Video"></div>
        </div>

    </div>

<!-- Components -->
    <script src="//s1.adform.net/Banners/Scripts/assets/components/Adf.ResponsiveHeader.min.js"></script>
 <!-- Components -->

    <!-- User code -->
    <script>
        Adf.ResponsiveHeader.setup({
            clicktag: dhtml.getVar('clickTAG', '//www.adform.com'),
            target: dhtml.getVar('landingPageTarget', '_blank'),
            scaleClose: false, //set true if you want to resize close button together with banner
            collapsedHeight: 66, //31 if you want to display only IAB Leave-behind "Show Ad"
            iframeClick: 1, //set 0 if you know how to add Adform clickTAG to your iframe code
            video: {
                sources: dhtml.getVar('videoSources'),
                poster: dhtml.getAsset(3),
                clicktag: dhtml.getVar('clickTAG'),
                onCollapse: 'stop' //set "pause" if you want video to pause on collapse
            }
        });

        Adf.ResponsiveHeader.init();
    </script>
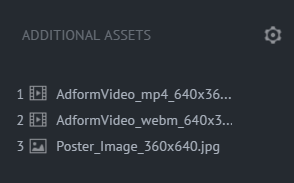
2) Assign banner assets (video files and poster image):

Example: Responsive Header: 31px height (based on HTML content)
Collapse stage will display only
button.
1) Code initialization:
<!-- Components -->
    <script src="//s1.adform.net/Banners/Scripts/assets/components/Adf.ResponsiveHeader.min.js"></script>
<!-- Components -->

    <!-- User code -->
    <script>
        Adf.ResponsiveHeader.setup({
            clicktag: dhtml.getVar('clickTAG', '//www.adform.com'),
            target: dhtml.getVar('landingPageTarget', '_blank'),
            scaleClose: false, //set true if you want to resize close button together with banner
            collapsedHeight: 66, //31 if you want to display only IAB Leave-behind "Show Ad"
            iframeClick: 1, //set 0 if you know how to add Adform clickTAG to your iframe code
            expandedStages: [
                dhtml.getAsset(4) || "", //628x162
                dhtml.getAsset(5) || "", //970x250
                dhtml.getAsset(6) || "" //1272x328
            ],
            video: {
                sources: dhtml.getVar('videoSources'),
                poster: dhtml.getAsset(3),
                clicktag: dhtml.getVar('clickTAG'),
                onCollapse: 'stop' //set "pause" if you want video to pause on collapse
            }
        });

        Adf.ResponsiveHeader.init();
    </script>
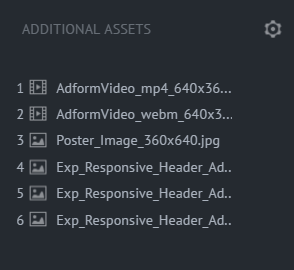
2) Assign banner assets (video files, poster image and expand section images):

Note: Keep the Additional Assets in the following order:
1. Video assets (mp4, webm)
2. Video poster (png, jpg)
3. Expand section images (png, jpg)
Exposed Methods
Adf.ResponsiveHeader.SingleExpanding you can find more info about available methods listed in the following document.
